
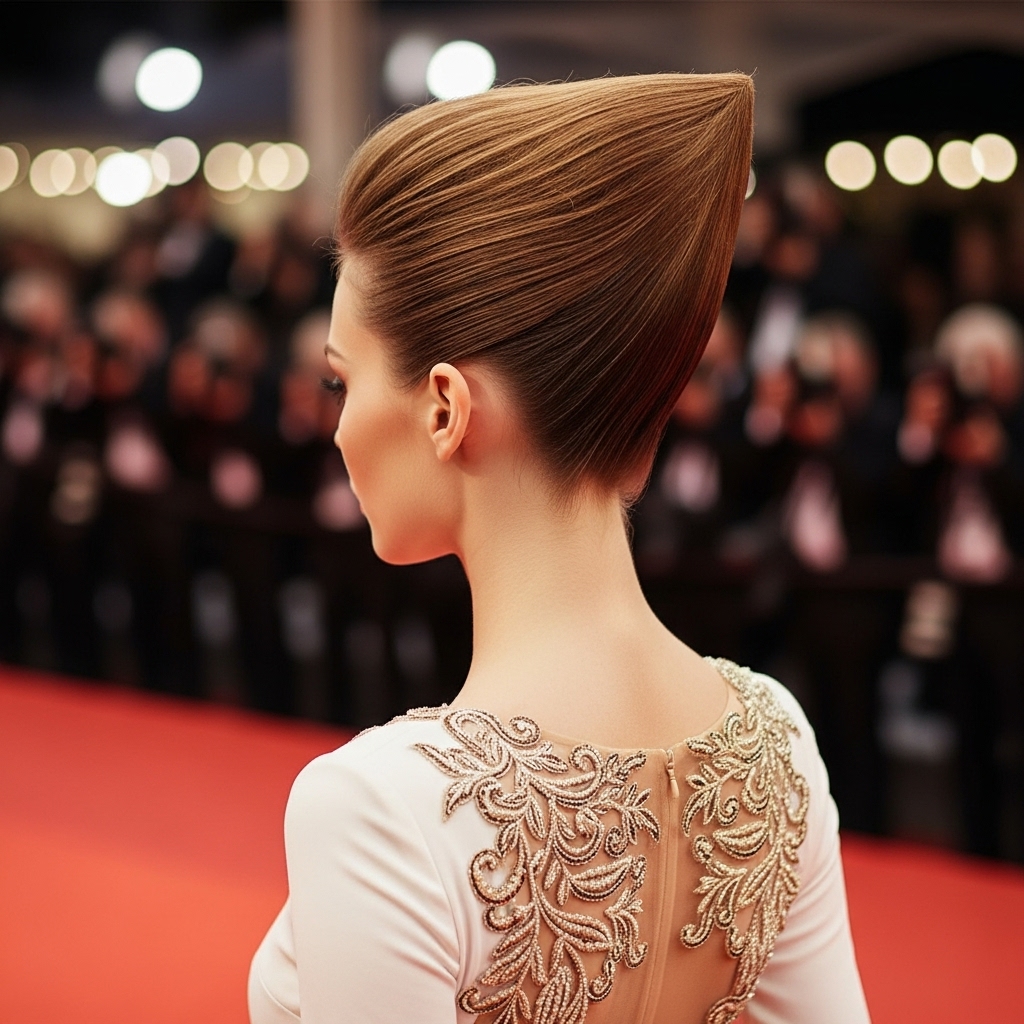
Are you tired of the same old top knot or classic bun? Do you crave a hairstyle that’s both elegant and edgy, sophisticated yet surprisingly easy to achieve? Look no further than the angled updo. This isn’t your grandmother’s prim and proper bun; this is a modern, dynamic twist on a classic that adds instant height, drama, and a touch of runway-ready flair to any look.
An angled updo is characterized by its slanted silhouette, often higher at the crown and cascading down to one side. It’s a versatile style that can be sleek and polished for a black-tie event, or soft and romantic with a few strategically placed tendrils for a wedding or date night. The best part? It works wonders in creating the illusion of volume and length, making it a secret weapon for those with finer hair.
If you’re ready to ditch the boring and embrace a hairstyle that truly makes a statement, you’re in the right place. This comprehensive guide will walk you through everything you need to know to master the art of the angled updo, from essential prep work to step-by-step styling and pro tips for making it last all night.
Why the Angled Updo is Your New Go-To Hairstyle
Before we dive into the how-to, let’s talk about the why. What makes the angled updo so special? For starters, it’s a powerful style that instantly elevates your entire appearance. The diagonal line it creates is visually interesting and draws the eye upward, highlighting your cheekbones and neckline. It’s a universally flattering shape that adds a dose of modern geometry to your look.
Furthermore, this style is a champion for adding volume. By building height at the crown, you create lift that can make even the flattest hair look full and bouncy. It’s also incredibly versatile. Whether you have pin-straight hair, bouncy curls, or textured waves, the angled updo can be adapted to suit your natural hair type, often enhancing its inherent beauty.
Finally, let’s talk about practicality. A well-executed angled updo is surprisingly secure. By anchoring the style at multiple points, it can withstand a night of dancing far better than a low, loose ponytail. It’s a style that says you’ve made an effort, without looking like you’ve tried too hard.
Essential Tools and Products for the Perfect Angled Updo
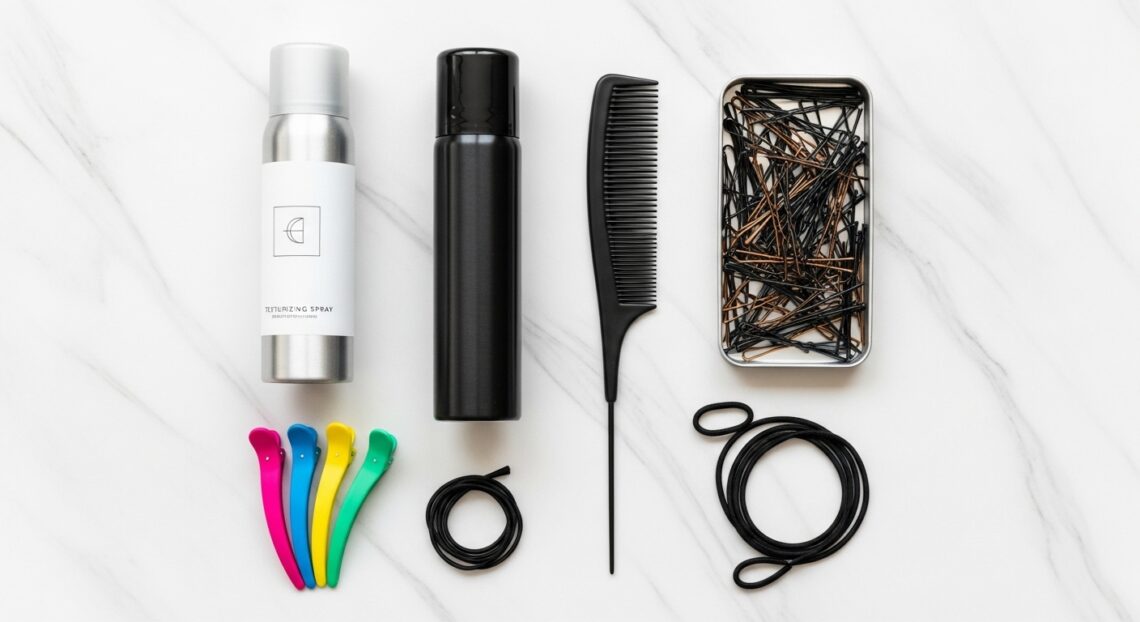
Like any masterpiece, a great angled updo starts with the right tools and materials. Trying to create this look without proper preparation is a recipe for frustration. Here’s your essential checklist:
Tools:
A teasing comb or brush: This is non-negotiable for creating volume at the crown, which is the foundation of the angled silhouette.
Fine-toothed comb: For creating sleek, polished sections and smoothing down flyaways.
Hair elastics that match your hair color: Clear or neutral elastics are great for securing the base without being visible.
Bobby pins galore: You will need more than you think! Opt for pins that match your hair color for a seamless finish.
Sectioning clips: To keep parts of your hair out of the way while you work on others.
A curling iron or wand (optional): If you have straight hair, adding waves before you start can make the updo look softer, fuller, and easier to grip.
Products:
Volumizing mousse or root-lift spray: Apply this to damp hair before blow-drying to build a lasting foundation of volume.
Texturizing spray or dry shampoo: This is your best friend! Texture gives your hair grip, making it easier to pin and hold. It also adds a lived-in, modern feel to the style.
Strong-hold hairspray: For locking everything in place once you’re finished.
Shine spray or serum: A light mist or small drop can be used to tame flyaways and add a healthy, polished gleam to sleek styles.

Step-by-Step Guide: Creating a Classic Angled Updo
Now for the main event. Follow these steps to create a classic, chic angled updo that will become a staple in your hairstyle repertoire.
Step 1: Prep and Create Texture
Start with day-old hair or hair that has been lightly misted with dry shampoo. The natural oils and added texture will provide a much better grip than freshly washed, slippery hair. If your hair is very straight, use a curling iron to create loose waves throughout. This isn’t for the curl itself, but for the body and texture it provides.
Step 2: Build the Foundation of Volume
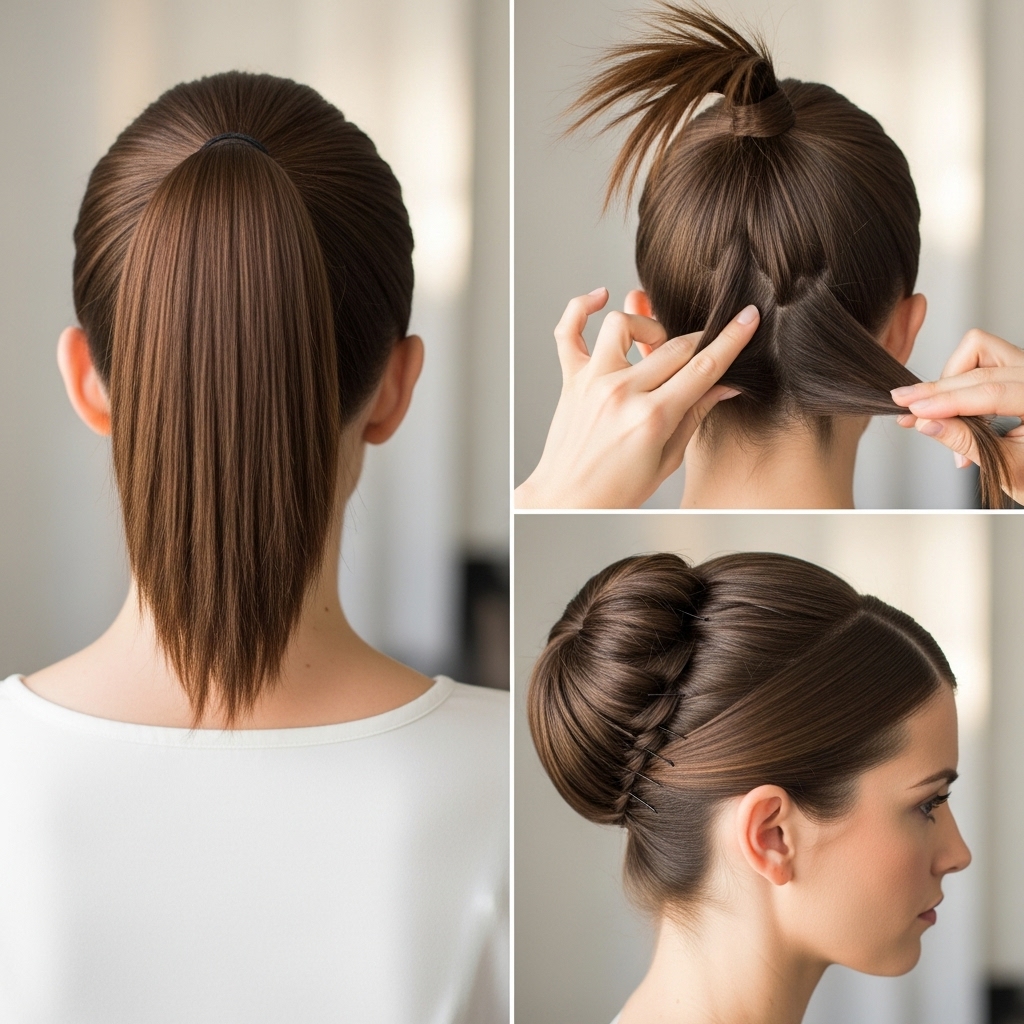
Flip your head upside down and gather all your hair into a high ponytail at the very top of your crown—this is the highest point of your angle. Before you secure it with an elastic, gently backcomb the hair at the crown with a teasing comb. This lift is crucial for the angled effect. Secure the ponytail with an elastic.
Step 3: Create the Angle and Shape
This is where the magic happens. Instead of pulling all the hair straight up, you’re going to direct it diagonally. Loosen the ponytail slightly and begin to pull the hair downward towards one side of your head (whichever you prefer). You’ll see the angled shape start to form. Don’t worry about it being perfect yet.
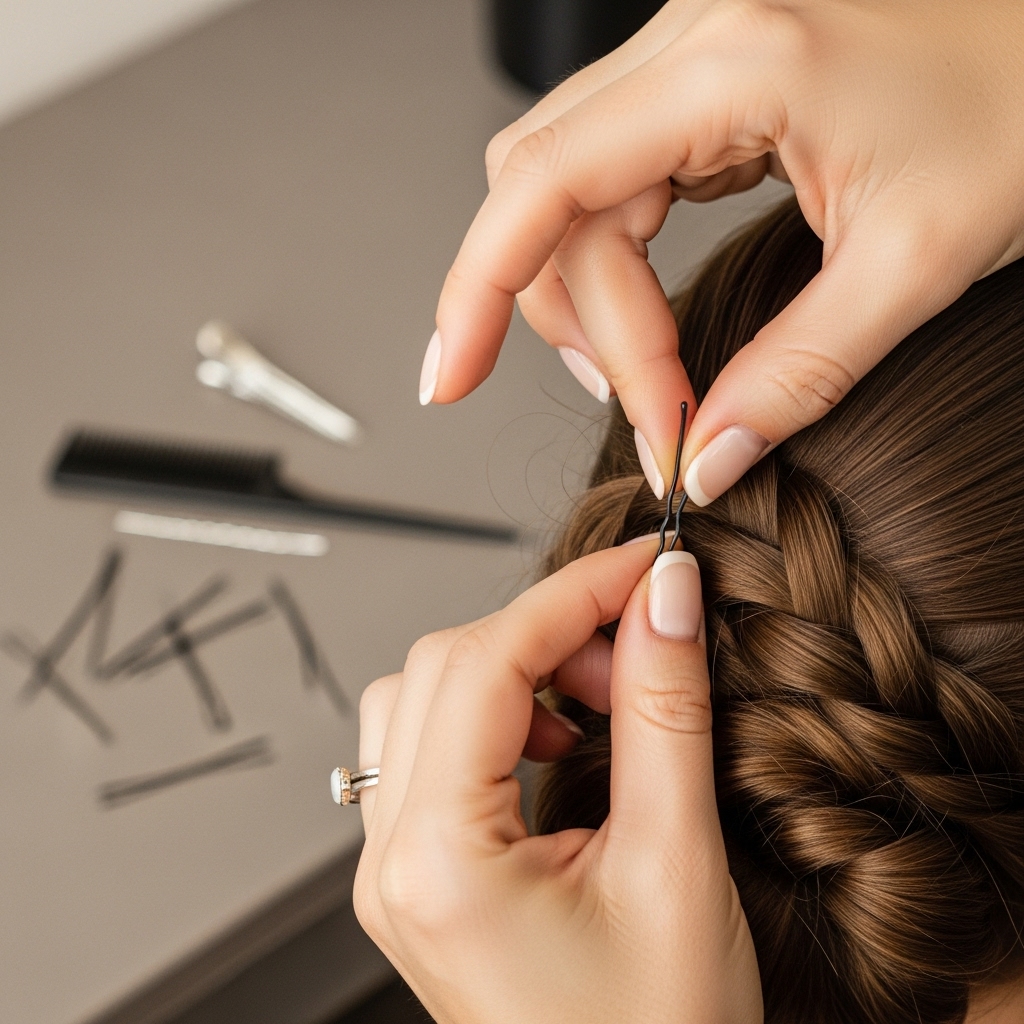
Step 4: Twist and Pin
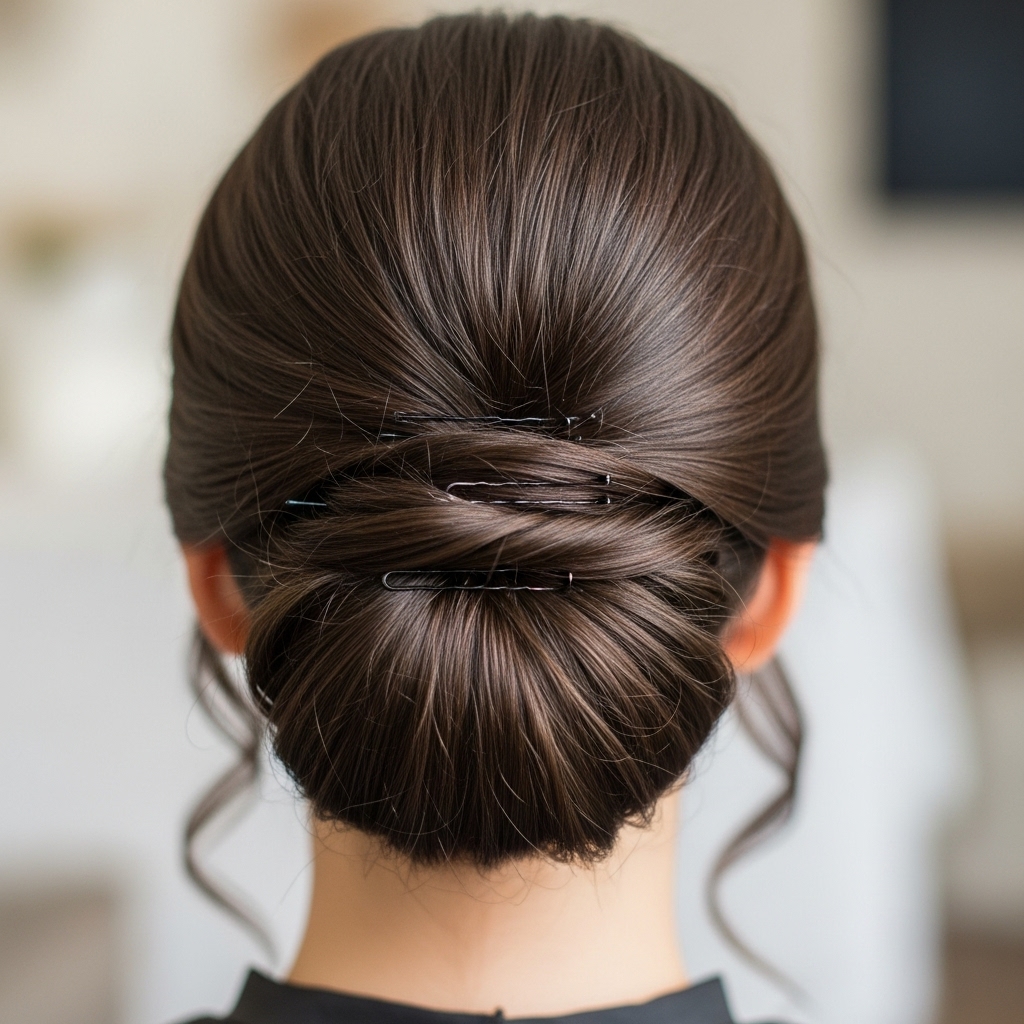
Take the tail of your ponytail and twist it loosely. Then, begin to wrap this twist around the base of the ponytail, following the diagonal line you’ve created. As you wrap, use bobby pins to secure the hair to your head. Slide the pins in against the direction of the wrap to lock them in place. Tuck the end of the twist underneath the updo and pin it securely.
Step 5: Finalize and Secure
Once the main body of the updo is pinned, step back and look at the shape. Gently pull at a few sections to create a softer, more romantic look, or smooth it down with a comb for a sleeker finish. Tuck in any stray pieces and use more bobby pins as needed. Finish with a generous mist of strong-hold hairspray to ensure every hair stays put.
Pro Tips and Tricks for a Flawless Finish
Knowing the basic steps is one thing; mastering the details is what separates a good updo from a great one. Here are some insider tips to elevate your angled updo.
For Maximum Volume: When backcombing, focus on the roots at the crown. Lift a section of hair, hold it straight up, and gently comb downward towards your scalp in short strokes. Then, smooth the top layer over the teased section for a polished look with immense hidden volume.
To Hide the Bobby Pins: Always insert bobby pins with the wavy side down against your scalp. This provides the best grip. To hide them, slide the pin into the base of the updo and then gently twist a small piece of hair over the visible part of the pin to conceal it.
Embrace the Tendrils: For a softer, more romantic look, pull out a few face-framing pieces and a wisp or two at the nape of your neck. Use a curling iron to style these tendrils into soft waves or curls. This breaks up the severity of the updo and adds a touch of effortless charm.
If You Have Layers: Shorter layers can be tricky, but don’t fight them! Use them to your advantage by leaving them out to frame your face. For any stubborn shorter pieces in the back, use a tiny dab of hair gel on a toothbrush to smooth them down and blend them into the style.
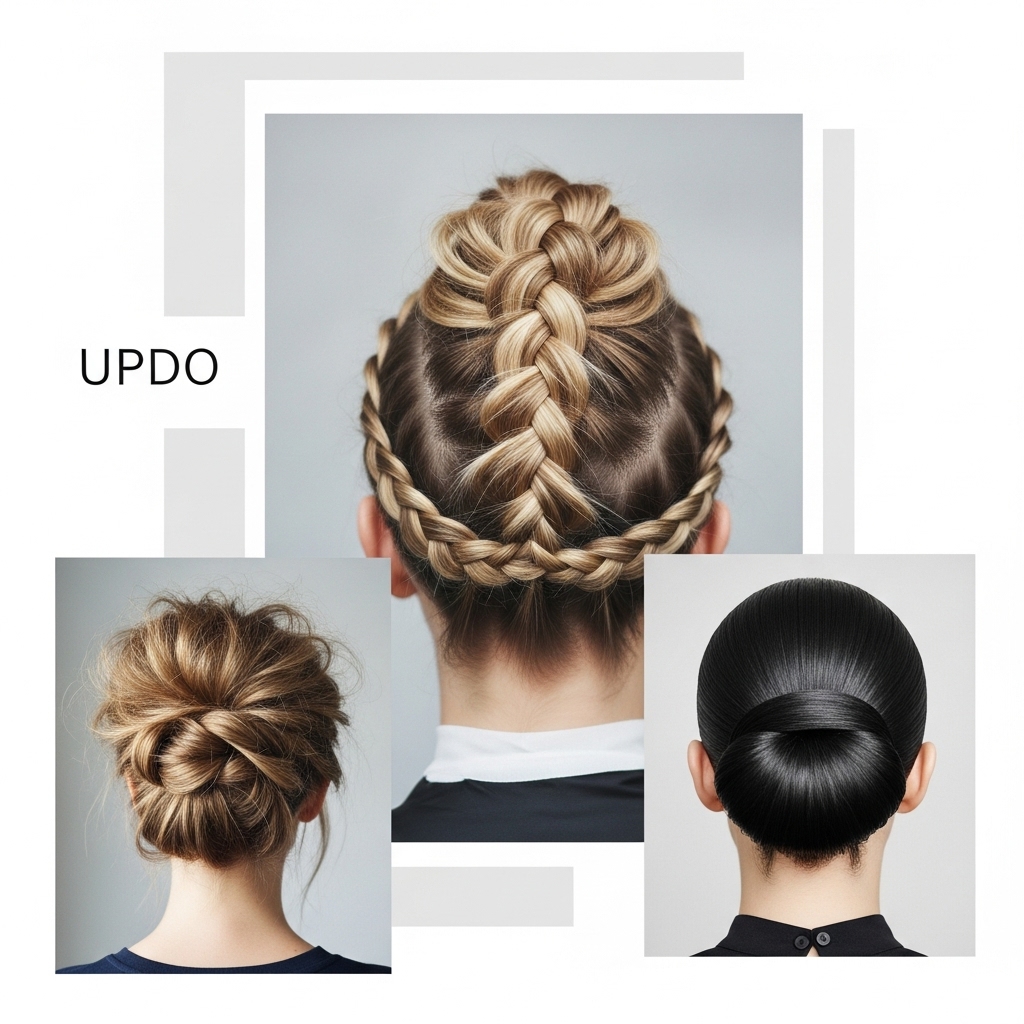
Variations on the Angled Updo Theme
The classic twisted updo is just the beginning. Once you’ve mastered the foundational shape, you can experiment with countless variations to suit your mood and the occasion.
The Braided Angled Updo: Instead of a simple ponytail, create a Dutch or French braid starting from your temple and working it back into your high ponytail. Then, proceed with the angled wrapping. This adds intricate detail and a bohemian touch.
The Messy, Textured Updo: For a more casual, daytime look, skip the smoothing and embrace the chaos. After creating your base, pull out more pieces, tug the updo apart to make it look larger and more effortless, and finish with a texturizing spray for a piece-y, lived-in finish.
The Sleek and Slicked-Back Updo: This is a high-fashion take. Apply a strong-hold gel or pomade to damp hair and comb it back into a severely high ponytail, ensuring not a single flyaway is present. Then, create a tight, angled bun. It’s a powerful, minimalist look that commands attention.
Troubleshooting Common Angled Updo Problems
Even with the best instructions, things can go awry. Here’s how to solve the most common angled updo dilemmas.
Problem: The updo feels loose and is slipping.
Solution: You likely didn’t use enough bobby pins or didn’t anchor them correctly. Bobby pins should criss-cross each other for maximum security. Also, ensure you created enough texture with product—slippery hair is hard to pin.
Problem: I can see the hair elastic.
Solution: Once the updo is pinned, take a very small section of hair from the underside of the bun, wrap it around the base to conceal the elastic, and secure it with a discreet bobby pin.
Problem: My updo looks lopsided or bulky in the wrong places.
Solution: Step away from the mirror, then turn back and look at it with fresh eyes. Often, the shape looks different from a slight distance. Gently adjust the pins to balance the silhouette, and don’t be afraid to take it down and start over. Practice makes perfect!
Rock Your Angled Updo with Confidence
The angled updo is more than just a hairstyle; it’s a statement. It’s a confident, modern, and undeniably chic choice that works for a boardroom presentation, a romantic dinner, or a festive party. It might feel a bit challenging at first, but like any skill, it gets easier with practice.
Remember, the goal isn’t always perfection. A little messiness can add character, and a few face-framing pieces can soften the look beautifully. The most important ingredient is your confidence. Once you’ve pinned that last strand and given it a final spritz, stand tall, own your look, and get ready to rock your angled updo.

